Tuesday, October 12, 2010

It Came From the Woods


Our next club painting competition is this Friday, and the theme this time is a unit of miniatures for either Warhammer Fantasy, 40K, or Flames of War.


Since I've been toying around with beastmen lately, and had already started building a unit of them, I decided to submit them for the competition, since the conversion and sculpting work had already been done, so for once I could just concentrate on the painting.


With the new edition of Warhammer Fantasy that came out this summer sort of pushing the game towards larger masses of troops, I had begun to think of a better way of doing things. I hate painting lots of the same miniature and I also hate having to spend an hour of prep time before and after each game putting away each miniature of a 40 man unit. When I played at a GT tournament with my zombie horde army (120+ zombie miniatures) I spent all of my time in between games setting up all my zombies into units.


So I decided to do 'thematic bases', where I put cool thematic elements in place of some of the models in the unit, and also combine bases to make large blocks which each contain several different bases. So this 40 man unit of beastman for instance, only has 12 different pieces which need to be put together on the table or in a movement tray, rather than having to line up 40 different beastman models.


Another reason was that for some armies, the idea of orderly looking ranks doesn't work for me. High Elves, Empire, Dwarves, and Bretonnians I can see in neat little ranks. Beastmen and zombies not so much. My thematic bases give more of the appearance of an unruly mob of beastmen stomping through the woods toward their prey. The two trees are mostly wire built with clay used to flesh them out and green stuff for the bark detailing.


The beastmen themselves are a box from the previous edition which contained a mix of gors and the smaller ungors. Again, I prefer idea of the mixed unit to separate units, so I used all of them together to form the unit.


The first thing I did was the trees, taking them from black coat, to basecoat of scorched brown, to drybrushes of bestial brown, to bestial brown mixed with bleached bone. The dead decrepit tree I painted in more gray and green tones. I did the trees first because I figured I wouldn't need to worry about getting paint on the beastmen while I did them. There are more details I plan on doing later, but the main body of work on the trees was done before I started working on the rest of the unit.


Using a recent White Dwarf article on painting beastmen for reference, I started working on the beastmen themselves, giving them a Tallarn Flesh skin coat and a scorched brown coat on their fur.


I did a Vermin Fur drybrush on the fur and then washed the fur with Devlan Mud and the skin with Ogre Flesh.


I did a final drybrush of Bestial Brown/Bleached Bone on the fur and a Tallarn Flesh highlight on the skin, followed by a further highlight of Tallarn Flesh/Bleached Bone.


Metals I started with Boltgun Metal, washed with Bedab Black, highlighted with Chainmail, and extreme highlighted with Mithril Silver. I went back and blended more Boltgun Metal in on the weapons because I wasn't satisfied with how they were looking. I'm going to do a little more weathering effects later on. Gold I did with a Shining Gold coat, followed by Chestnut Ink wash, and a final highlight of Burnished Gold.


Hooves I did with a very dark grey mix of Chaos Black and Skull White, then a Denab Stone extreme highlight.


I wanted some color in there with all of the browns, so for the hafts of the weapons, I did Scorched Brown/Dark Angels Green with a Bestial Brown/Dark Angels Green drybrush.


The belts were Bestial Brown/Chaos Black with a Graveyard Earth highlight.


The wrappings were Snakebite Leather with Bleached Bone highlight followed by a Devlan Mud Wash.
The loincloths were a mix of Knarloc Green and Camo Green, washed with Bedab Black, and given multiple highlights of the original coat with an increasing amount of Bleached Bone mixed in.


Horns were done with a Scorched Brown basecoat followed by Bestial Brown, Tausept Ochre, Bleached Bone, and Skull White.


Bones and skulls were Snakebite Leather followed by a Bubonic Brown drybrush and a final Bleached Bone drybrush.


Teeth were Bleached Bone, followed by a Red Ink wash and a drybrush of Skull White.


I've done the bases with a Graveyard Earth/Scorched Brown/Chaos Black coat followed by a Graveyard Earth drybrush. There are now just some fun extra details on the miniatures if I want to do them, some work on the sorcerer character, thematic scenery like the large boulder and deadfall and then basing stuff and details on the trees.


This is kind of a weird feeling for me because it's so close to being done with 3 days to go till the day of the competition. It's a good thing I've got so much packing to get done or I wouldn't know what to do with myself!


Saturday, September 18, 2010

Eyes of the Medusa 1850 list

Eyes of the Medusa
1850 pt Chaos Space Marine list


HQ

205 - Lord Horrificus (daemon prince)
mark of tzeentch, wings, warptime, gift of chaos

135 - Chaplain Olgein (chaos lord)
mark of nurgle, daemon weapon


Troops

215 - Chaos Space Marines x8
aspiring champ, power weapon, icon of khorne


266 - Chaos Plague Marines x8
aspiring champion, powerfist, meltagun, icon of nurgle, rhino dedicated transport

104 - Summoned Daemons x8


Elites

279 - Chosen Chaos Space Marines x8
aspiring champion, power fist, power weapons x2, meltagun, flamer, icon of chaos glory, rhino dedicated transport


Heavy Support

145 - Predator Tank
extra armor, lazcannon sponsons

225 - Obliterators x3

150 - Defiler
close combat arm x2


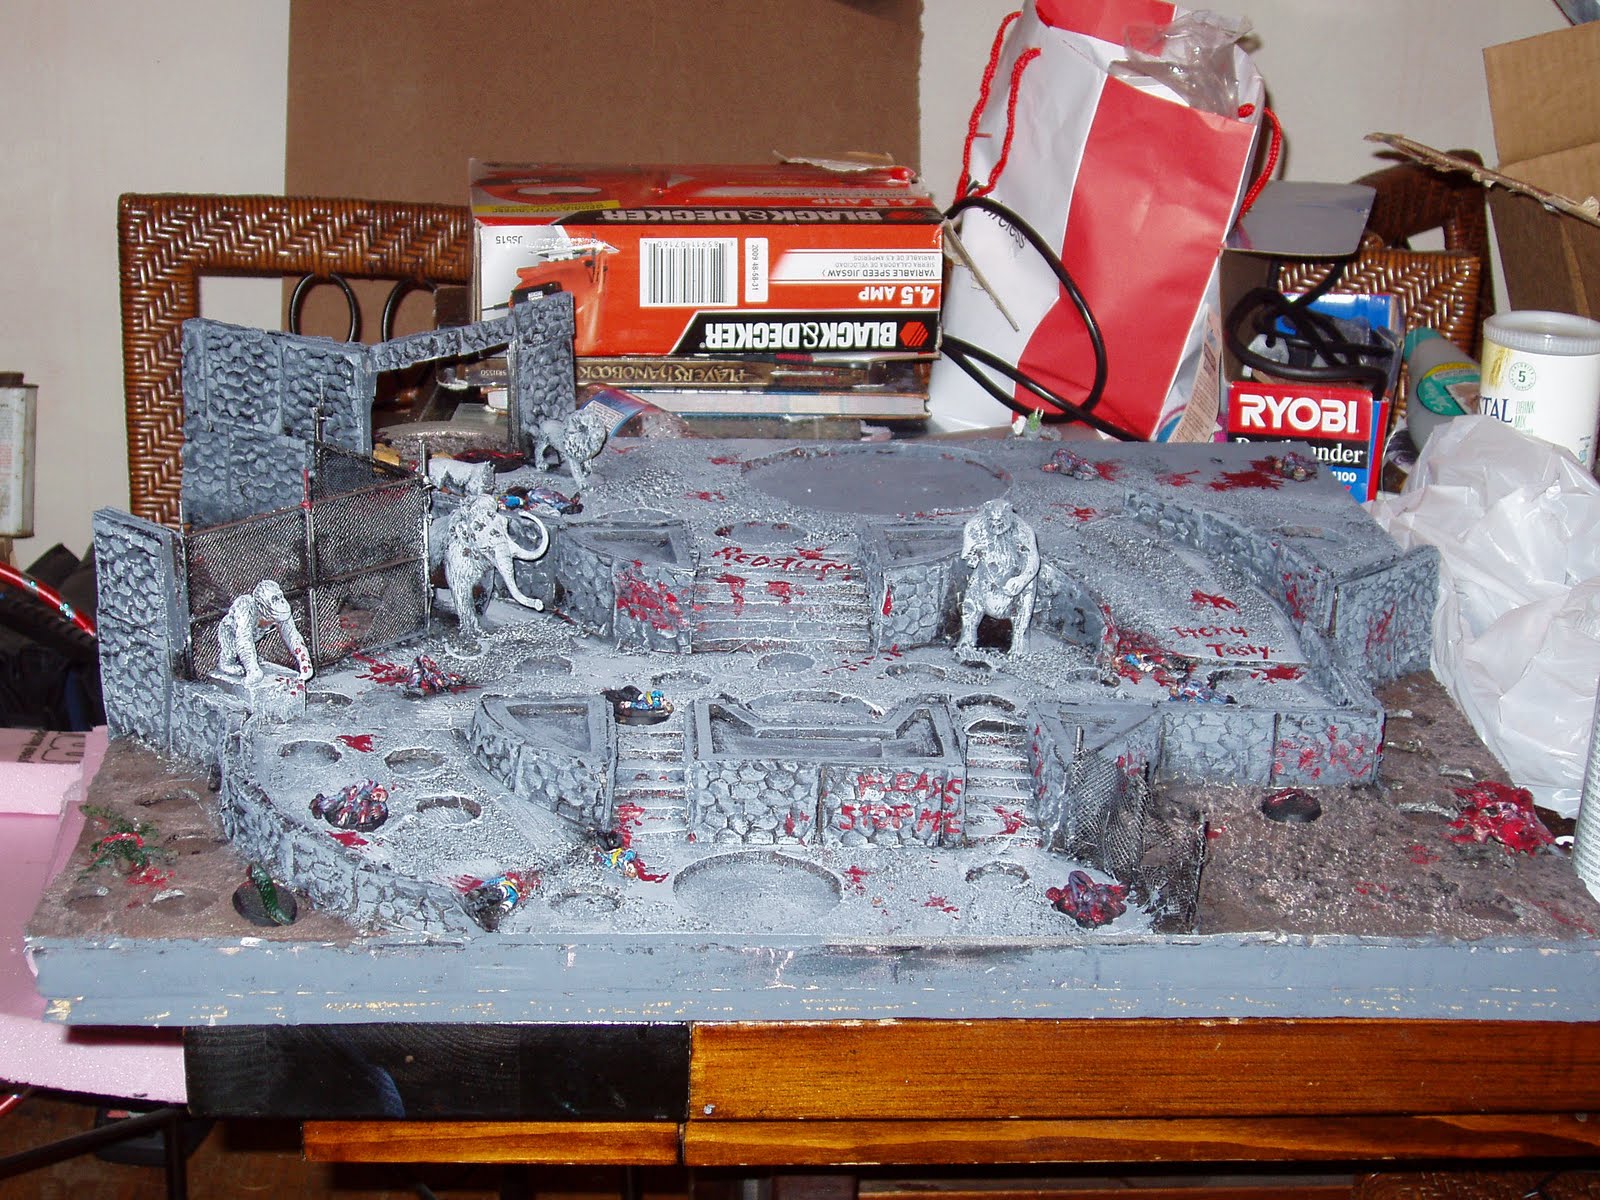
Eyes of the Medusa display base


Today I finally finished the Eyes of the Medusa chaos space marine army I had been working on since around March of this year.
From nearly the beginning of the concept of the army, I had the basic concept of the display base I wanted to do along with it, and I began work on the base itself a couple weeks ago as the army was going into the final stages of construction and painting.
As I mentioned in previous blog posts, the Eyes of the Medusa were conceptualized as a space marine chapter that was lost in the warp and turned to chaos in an orgy of death and madness, in the vein of movies like Hellraiser and Event Horizon. From the beginning, I knew that it would be the darkest thing I've ever done before in my miniature and wargaming hobby (and with armies like Kingdom of the Zombies and some of the stuff I've modelled for use in my Ravenloft campaign, that's saying a lot)
In order to get into the appropriate dark and disturbed mood for starting work on the army, I prepped by reading the Warhammer 40K novel 'Fulgrim', watching Event Horizon a few times, and playing the PS2 game Manhunt. Manhunt is the most gruesome game I've ever played, where the protagonist is a convicted criminal caught up in the manipulations of an evil snuff film director in a "Running Man" type situation where he is hunted through a series of locales by gangs of psychotic thugs, whom he must brutally stalk and murder in order to stay alive. (veteran actor Brian Cox did the constant voice of the director giving you orders through an earwig, which really lent a lot to the experience)

One of the locales is the abandoned Carcer City Zoo, and it gave me the idea for the display base, which was based on the level design from the game.


Immediately I started thinking of the possibilities for the display base. I had wanted to bring out the evil and madness of the army as the recurring theme. As an avid animal lover, I couldn't think of anything more horrific than the idea of the chaos corrupted lunatics going through the pens in the zoo and slaughtering all of the animals. I also had a bag full of plastic animals I have accumulated over the years from buying a set here or there for one specific creature I needed for something. I also had a bag of disembodied animal parts that were the leftover from previous conversion projects.

So the zoo was a definite go. A month or two ago, I took out the graph paper and started the planning process for the display base. It took a number of attempts until I got a design that had the feel of the zoo from the video game, could be built within the size range I needed, and would be able to accomodate the models of the army I needed to put on it.

A couple of weeks ago, I started the building process.

I knew at this point that I would want to bring this army to the September Brothers Grimm tournament, and having just got back from the August tourny with my Ghosts N Goblins army, I decided I wanted the display board to have a smaller profile, as the Ghosts N Goblins display base was so tall that I was unable to store it under a couple of the tables that I was playing on.

So I decided to use a plywood base, which would give me the support the base needed without me having to use a thick 2" foam base like I used for G&G. This would make the display base significantly heavier, but sturdier and much more squat.

After that I started building up the tiered structure with 1" pink insulation foam and foamboard. In the pictures you can see that some of it has been painted blue. This is because I didn't have any 1" board on hand and decided to recycle a beach terrain board which I was probably going to end up throwing away anyway.

I did a tiered effect because I wanted to be able to recreate the look of the Zoo in the game, with multiple levels connected by gently sloping ramps and staircases. I used foamboard for the ramps. Originally there were going to be two on each side, as you can see from the markings on the board in the picture. I decided to go with one ramp on each side, so that I would have more room for the animal enclosures.

I generally use foamboard as a topper for my display bases, because it's about the same thickness as a warhammer slotta base so it's easy to just trace the bases on the foamboard and then cut out slots to put them in. I added more slots than I needed for this particular list. I wanted to make it possible to change around the army if I wanted to. There are slots to increase the size of the four units from 8 to 10, and there are also slots to add in five terminators. In the meantime, I would make 'filler bases' with scenic details on them. Later in the development in the base, I realized these filler bases would also make good objective markers.

I also used the foamboard to make the staircases, by stacking smaller and smaller lengths on top of one another.

I have been doing a lot of mold making in recent months and have made a bunch of molds of 'cool bitz' that I would like to make more of for my terrain and conversion projects. One of the things I molded were a few stone wall pieces from an old Mage Knight modular dungeon kit. The wall sections are 2" by 2" and I thought they would be perfect for making buildings and other structures. I ended up using them extensively to make the stonework for this display base. The curved pieces I did by glueing them in place on the curved wall sections right after casting while they were still soft and bendable.

For the fencing sections of what would be the monkey cage, I made the frames with thin plastic piping from Hobbytown. I laid out a section of screen door screening over a piece of insulation foam, and then sprayed the area I wanted to use with zip kicker. Then I put glue along one side of the frame and pressed it down, where it instantly bonded to the zip kicker. I put the foam under it because it melts away from the reaction of the glue and accelerant, so no unwanted crud gets stuck on the other side like there is if you glue it down on top of paper.

For the shorter fence on the Nurgle ifested side of the display board, I just used fancy toothpicks as fence posts, rather than building a frame. After the fences were done, I used a hobby knife to cut some holes in them where the warriors of chaos would have cut their way in (and out) of the animal enclosures.

With the fences glued into place it was now time for some fun with little plastic animals. I used a pin vice drill and my hobby knife to gouge bolter holes and make pieces blown off of the animals which were going to be statues, then went and dismembered a bunch of other animals that were going to be carnage on the display base.

I wanted to have some human casualties of the attack as well, and to this end, I made molds of another of my favorite bitz, the corpses from Flintloque's Graviski Reanimator kit.

I cast a bunch of corpses and glued them onto the display base and glued some down to slotta bases to make most of my 'filler bases'.
Throughout the final stages of construction, I also glued down the sand in layers, giving time in between to allow for drying. I started with kitty litter for the areas I wanted to be most textured, then did sand, and finally, some talos.
Then it was time to spraycoat the display base. Before I did, I went through and used red paint (because I had a lot of cheap red craft paint) to go over areas that were exposed styrofoam. This is because exposed styrofoam will melt from the spray paint.

Now it was finally time to start painting!
I first went over all of the stone wall sections with dark grey. I used cheap acryllic craft paints for all of this. Then I lightened the grey and did my first coat on all of the 'concrete' surfaces, then lightened it even more to do the first coat on the animals. Then I started with a dark brown for the ground of the animal enclosures.
After giving it all some time to dry, I did my second coat with lighter versions of the previous colors.
I did a third coat as well, which was a very light drybrushing.
Then I did the fences in Boltgun Metal.
Next was the bodys and the carnage, which were all painted appropriately and then given good amounts of Red Gore for their fatal wounds and the pools of blood they lie in. Red Gore was also added in spatters to the display base as a whole.
Now really having some fun, I started adding some good old bloody scrawls, the staple of horror movies. I included nods to a couple different sources.
Redrum is the most obvious and recognizable of these.
"Please stop me" is from the game Manhunt, where it is written in blood on the forehead of the masks worn by one of the lunatics stalking you.
"Itchy.. Tasty.." is a reference to the original Resident Evil. It is the final journal entry of a researcher who was exposed to the virus and became a zombie cannibal.
"Do you see?" is a line repeated several time by a character from Event Horizon, as he shows a character mental images of hellish depravity.
The final details were the reinforced glass of the big cat enclosure, which I just used the plastic from a large blister pack for.
The foliage in the planters was made by drilling holes and then gluing down bits of a plastic plant I got from a craft store almost a decade ago and am still getting tons of use out of in scenery projects.
And here again is the finished version.

I'll do another post at some point soon, detailing more of the miniatures that made up the army, where I will include some more close up shots from this display.

Tuesday, September 7, 2010

I've been working on the Eyes of the Medusa since my last post, and now with a Brothers Grim 40K charity tournament that I've signed up for coming up in a couple weeks, I've kicked it into high gear and for once, things are actually looking pretty good two weeks out, with only Lord Horrificus, three obliterators and a predator to finish painting.
Over the weekend I added a couple more things to the Completed column. My chaos lord chaplain, his Nurgle cult of fallen space marines, and Granfaloon, the greater daemon responsible for the corruption of the once noble chapter of space marines.

Chaplain Olgein and the cult of Nurgle
The chaplain was a conversion of (I believe) the space marines captain from the Black Reach set. I added a power fist, and an arm with a crozius, distended his belly with some green stuff and added holes in the armor, and then a modified Khorne berserker head for the skull helmet. I glued sand down in patches on the armor to represent it being corroded and encrusted with filth. I sculpted some foul growths on the crozius (now a daemonic weapon) with some tentacles coming out. As a finishing touch I added a nurgling on his shoulder.

The rest of the group were converted from plague marines and space marine parts thrown together. The medusa head shoulder plates were sculpted from scratch and then molded and casted.
The rhino transport (one of the older, smaller models) had the hobby knife taken to it, and then was covered and sand and green stuff.
Everything was painted in the chapter colors (snot green/knarloc green, scorpion green, sunburst yellow) and then 'screwed up' with a brown ink wash followed by a devlan mud wash.

Granfaloon, the Eye of Madness
This guy was fun. I had done half casts of the corpse cart corpse pile with the idea of doing a wall of corpses or something equally disgusting at some point along the line, and then thought of making a ball of corpses with tentacles and an eye in the center.
Why, you might ask?
I'm sure psychiatrists have a definition for it, but the long and short is that I saw it in a video game and have wanted to make a model of it for a long time now.
As I said, I'm sure there's a term for my condition.
Regardless, once I figured out how I could do it with my new corpse pile half mold, I set about my task with gusto. The greater daemon started life as a plain cardboard christmas tree ornament from the craft store. I drilled some holes in him and threaded wire through for the tentacles then twisted more wire to make them thicker. Then I started casting my 'tiles' of corpses and gluing them all over the ball, overlapping at several points. With green stuff I sculpted the meat on the tentacles and then filled in empty spaces between the corpses. The casting compound dries white so Mrs. Carnivean had taken to calling this thing my 'big popcorn ball with tentacles' as I worked on it off and on over the past month or two.
To be honest, that was exactly what it looked like, and I was starting to get a little worried about it.
Once I spray coated it black and added the first coat of tallarn flesh/rotting flesh I could instantly see how cool it was going to look, as all the tortured bodies began to stand out in all their ghoulish glory. I did a red ink wash, followed by another coat of tallarn flesh/rotting flesh. I may go back and do more washes, but right now I'm not sure if it needs it. I did painted the eye and the tentacles, and here he is.
The fluff for this is that the daemon swathes itself in the tortured souls of those it has brought to damnation. I had wanted the greater daemon in the army to be the thing that appeared to the Eyes of the Medusa in the warp and drove them all to madness, so I knew I needed something that would be pretty horrific to look at. Originally I was going to go with something with multiple goat heads on a tentacled body, but I decided to save that look for the Jabberslythe I'm eventually going to build for my Beastman army. When I thought of doing the big corpse ball to represent him I realized that image would definitely be something that could drive people insane. I named him Granfaloon, since that was the name of the boss creature from the video game (Castlevania) that inspired me to build him.

Monday, August 23, 2010

Brothers Grimm Fantasy Tournament 8/22/10

Yesterday I went to a WFB tournament held at Brothers Grimm in Long Island. A bunch of my fellow club members had been to previous tournaments there and had great things to say, so I was really looking forward to finally getting to do one.

I carpooled with my Ordo-Ineptus friends Bob and Eric.

Bob took first place with his daemon horde.

Eric and Sean (another Ordo-Ineptus member that participated)Sean also did well representing the club with 2-1 records (and an amazing comeback victory for Sean after losing 1000 points of his army in the first turn)

And I won Player's Choice for my Ghosts N' Goblins army, which more than made up for my 0-3 record (my ghoulies and beasties are lovers, not fighters!)

The tournament had a great turnout with over 20 players, and the organizers over at Bros Grimm put on a great event. I was glad to finally get the chance to play in one of theirs. Food was grilled up in back throughout the day for the players, and the first place trophy (a golden skull) looked awesome!

Once the playing started I was too busy doing random movement for my 18 fanatics to walk around and take pics of the other battles, but I got some pics of a few of the other armies before everything started and some pics from my three games.

Thursday, July 29, 2010

Not just dead - BUCKY DEAD!

In my previous post about working on Flames of War models, I related the difficult time I had working on such a small scale with my Red Skull conversion and how I wasn’t going to attempt any more conversions for Flames of War.


Which brings me to my Baron Zemo conversion.


While the Red Skull is fairly well known as a villain, the good baron may need more of an introduction. Zemo first appeared way back in Avengers #4 (1964) as a Nazi scientist who had fought Captain America and Bucky during World War II and escaped to South America at the war’s end, where he returns in the present day to combat the Captain once more. Zemo’s claim to fame was that he was responsible for the death of Captain America’s partner, Bucky, and caused the Captain to become frozen in ice in the North Atlantic and in suspended animation until he was found and revived in the present day by the Avengers.


With me so far? Good.


Now any comic book fan worth his salt knows that nobody stays dead in comic books. The title of this post, ‘Bucky Dead’ is a comic geek’s term for a state of permanent death in comics, since Bucky had stayed dead for over 40 years. When someone was Bucky Dead, they weren’t going to be coming back. For instance, everyone had always thought Norman Osborn (the original Green Goblin) was Bucky Dead, since he stayed dead for a good 25+ years, before crappy writers and editors, who weren’t happy with how much they had already buried the Spiderman series with the god-awful ‘Clone Saga’ in the late 90’s, decided to bring poor Norman back from the dead.

After Norman Osborn was ‘unkilled’ in comics, it was down to just Bucky, Uncle Ben (no, not the guy on the rice box, the guy who was Spiderman’s uncle, who was killed by the burglar who Spiderman had let esca – you know what, if you don’t know this one, you’re probably not enough of a geek to be reading this blog to begin with), and Jason Todd, the second Robin, who was killed by the Joker in the late 80’s. Interesting thing about JT’s death was that it was the result of a fan poll. Jason beaten to a pulp by the Joker and strapped to a bomb in a warehouse and at the end of the issue they listed two hotline numbers. One to call in if you wanted him to live, the other to call if you wanted to see him dead. Fans wholeheartedly wanted to waste the brat.
So Jason Todd is dead, Uncle Ben is dead, and Bucky is dead.

Really dead.

Permanent dead.


Raid kills bugs dead.


Dead.


Cut to 2006, when the current folks at Marvel comics, they of the ‘Spiderman makes a deal with Satan to save the life of 126 year old Aunt May’ storyline (oh and I only wish I were joking), brought back Bucky. Not to be outdone in the stupidity department, the boys over at DC brought back Jason Todd the same year.
So now I guess it’s just ‘Uncle Ben dead’.


Sorry for that long departure/rant. Back to Zemo.

The original Baron Zemo was killed fighting Cap in Avengers #15 (1965).


(okay, so I guess it’s ‘Baron Zemo Dead’ too)


His son, Helmut (the original was Heinrich) comes around in the 70’s and takes up his father’s mantle and is now a well known villain and sometime leader of the popular villain-turned-hereoes team, the Thunderbolts. But enough about Helmut. Flames of War is a WWII game, so I couldn’t sneak him in there. Sorry Hel.

I love playing the villains, and just about all my wargaming armies are evil ones; undead, daemons, evil robots, forces of chaos, etc. What brought me to Flames of War was the idea of doing a very comic-y, popcorn cinema Nazi army, forgoing historical accuracy in order to discard the idea that any of these soldiers could be non-party members who didn’t want to be out there fighting any more than anyone else did, and also to not go into the unspeakable horrors we all know the Nazis committed.

Basically, to keep things ‘popcorn’ or Rated PG. Because in fiction, especially fairly light hearted fiction like comic books and popcorn movies, Nazis make for great villains. I think this is because you don’t have to spend a lot of time going into what makes the villain so evil. As soon as we learn the villain is a Nazi, we already know he’s evil, so we can move on with the plot without having to show the villain doing really nasty evil stuff that might darken the tone of the story. Also, knowing the villains are Nazis – and therefore evil – lets us watch the good guys mow them down throughout the movie without the film getting a gritty Sam Peckinpah feel. Raiders of the Lost Ark, Last Crusade, Kelly’s Heroes, the Rocketeer, and Dirty Dozen are good examples of the Nazis used this way in films, and even in Star Wars, the Nazi similarities of Darth Vader’s bad guys – along with the fact that they blow up a planet full of innocent people a third of the way into the first film – allows you not to care when the stormtroopers are getting gunned down and blown up en masse by the heroes throughout the series.

So for my conversion project – and I promise I’m actually going to start talking about building the model soon – I decided to use Baron Zemo as part of a diorama that would function in the game as an objective marker. The objective marker is what the other player is trying to capture. In a typical game of Flames of War, there are several of them in play. They are often represented by a model of a destroyed tank, or crashed plane. My idea was to model an iconic scene from the Captain America mythos and use it as one of my objective markers.
In the flashback story where Bucky is killed and Captain America ends up in suspended animation, the duo are sent to stop the nefarious Baron Zemo from stealing a super top-secret British drone plane. They are captured by the madman and his powerful android robots that grow from the size of toys into giants (now do you see why I wanted to do a comic book Nazi army? The modeling potential for all that wonky Nazi science is endless)
Zemo ties the unconscious heroes to the drone plane (after dressing them in basic soldier uniforms) and prepares to launch it, giving his Villain Monologue ™ as he does so. Cap manages to get himself and his partner free just as the plane is taking off, but Bucky attempts to hang on to the drone plane to stop it. Unfortunately, the drone plane had a self destruct mechanism (or a bomb planted by Zemo) and it explodes, killing Bucky (yeah, I said ‘killing’ - Eat it Quesada and Brubaker) and causing Captain America to plummet into the icy waters of the English Channel, where he freezes into a block of ice and causing his body to go into a state of suspended animation, thanks to the Super Soldier Serum in his body (see, the Titantic didn’t need more lifeboats, they just needed vials of Super Soldier Serum !)

Now with the idea in my mind, it was onto the conversion work. For the Baron himself, I started with a German soldier about to throw a stick bomb while holding a rifle by the barrel in his other hand. The rifle barrel made an excellent lever for him to pull on the drone plane’s control panel (made from bits of sprue and a small plate from a 40K Ork vehicle kit), while the grenade was easily cut off to leave just his clenched fist, which was repositioned into a dastardly fist-waving pose by carefully bending the metal. Most of his head I carved or shaved away with a hobby knife or file, and I did the same with his backpack. I then proceeded to sculpt Zemo’s garish costume with green stuff from Games-Workshop.
For the drone plane I used a cheap toy version of a modern jet plane. It was a slightly smaller scale than Flames of War models, which worked to my advantage to help disguise the actual jet. I also carved and shortened the wings and fins, and also added a toothpick spine to the nose of the plane, and a sewing pin antenna (wanted to make the remote control obvious, with that and the matching antenna on Zemo’s control panel)
Cap and Bucky were made from more German soldiers, carefully chopped, filed, and sawed, with green stuff hair instead of helmets. They were trussed to the plane with thin wire. For the base of the model, I used a square large monster base from Warhammer. The launching ramp for the plane was made from plastic model railroad bits. The base was coated in gray pumice, and after it dried, I added some wires to look like cables going across the ground leading to the drone plane’s control panel.
The painting went well with Zemo - I was happy with the how well the colors I mixed matched the page from the comic I was using as a reference. The plane was a little trickier. In the comic, the drone plane is actually British, and is commandeered by the Nazi villain, but I thought the Zemo reference was already obscure enough (especially since Cap and Bucky aren’t in their usual costumes), so I decided to make it a Nazi drone plane in order to make it less confusing. With the swastika on the plane, everyone will understand that Zemo is a bad guy, and the people strapped to the plane are members of the allied forces. I realize I still suck at freehand drawing with a paintbrush when I tried doing swastikas on the wings (since you can’t see both sides of the tailfins at the same time, it isn’t as important that they match exactly) so painted over them and added Totenkopf decals that I’d been using for the rest of the army (I figured that symbol would be appropriate for a Nazi force that was led by the Red Skull).
And here is the finished product. I’m very happy with it, though I will probably at some point do some little touch ups and detail work on the plane and the two prisoners, and add some details like lichen scrub bushes to the ground on the base.