Today I finally finished the Eyes of the Medusa chaos space marine army I had been working on since around March of this year. From nearly the beginning of the concept of the army, I had the basic concept of the display base I wanted to do along with it, and I began work on the base itself a couple weeks ago as the army was going into the final stages of construction and painting. As I mentioned in previous blog posts, the Eyes of the Medusa were conceptualized as a space marine chapter that was lost in the warp and turned to chaos in an orgy of death and madness, in the vein of movies like Hellraiser and Event Horizon. From the beginning, I knew that it would be the darkest thing I've ever done before in my miniature and wargaming hobby (and with armies like Kingdom of the Zombies and some of the stuff I've modelled for use in my Ravenloft campaign, that's saying a lot) In order to get into the appropriate dark and disturbed mood for starting work on the army, I prepped by reading the Warhammer 40K novel 'Fulgrim', watching Event Horizon a few times, and playing the PS2 game Manhunt. Manhunt is the most gruesome game I've ever played, where the protagonist is a convicted criminal caught up in the manipulations of an evil snuff film director in a "Running Man" type situation where he is hunted through a series of locales by gangs of psychotic thugs, whom he must brutally stalk and murder in order to stay alive. (veteran actor Brian Cox did the constant voice of the director giving you orders through an earwig, which really lent a lot to the experience)
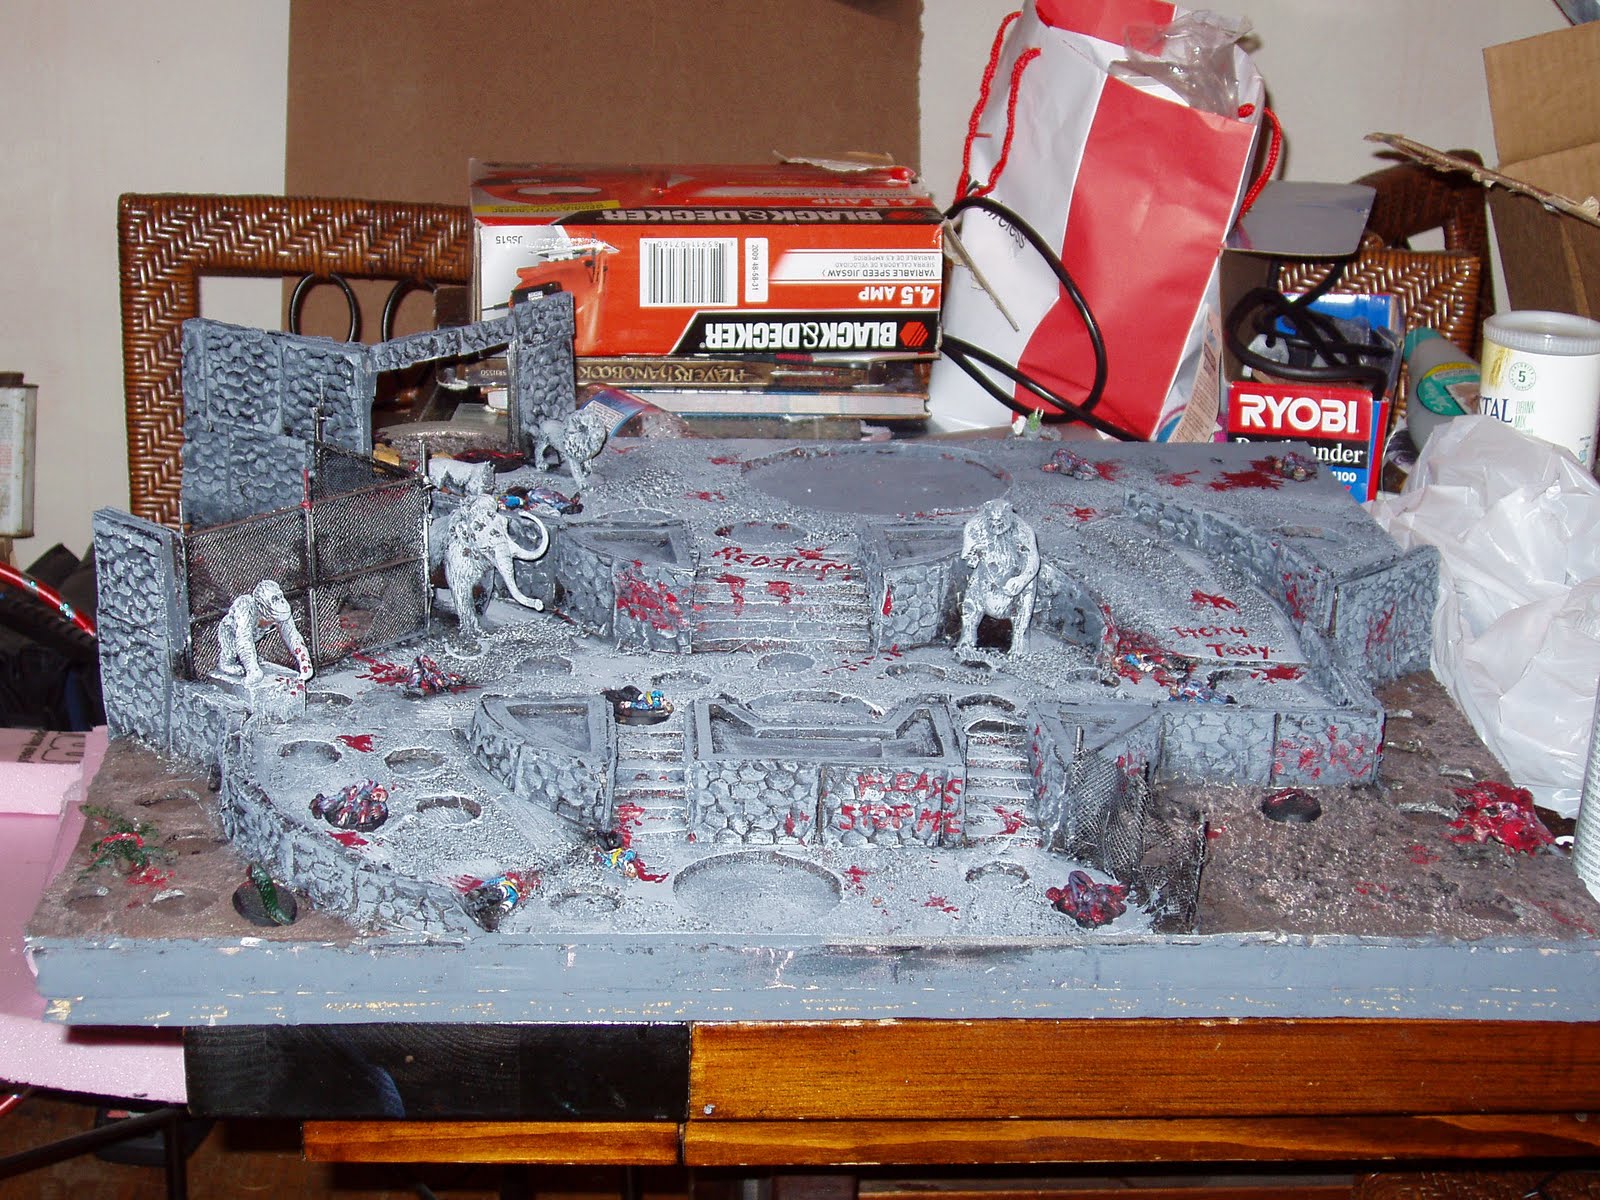
One of the locales is the abandoned Carcer City Zoo, and it gave me the idea for the display base, which was based on the level design from the game.
Immediately I started thinking of the possibilities for the display base. I had wanted to bring out the evil and madness of the army as the recurring theme. As an avid animal lover, I couldn't think of anything more horrific than the idea of the chaos corrupted lunatics going through the pens in the zoo and slaughtering all of the animals. I also had a bag full of plastic animals I have accumulated over the years from buying a set here or there for one specific creature I needed for something. I also had a bag of disembodied animal parts that were the leftover from previous conversion projects.
So the zoo was a definite go. A month or two ago, I took out the graph paper and started the planning process for the display base. It took a number of attempts until I got a design that had the feel of the zoo from the video game, could be built within the size range I needed, and would be able to accomodate the models of the army I needed to put on it.
A couple of weeks ago, I started the building process.
I knew at this point that I would want to bring this army to the September Brothers Grimm tournament, and having just got back from the August tourny with my Ghosts N Goblins army, I decided I wanted the display board to have a smaller profile, as the Ghosts N Goblins display base was so tall that I was unable to store it under a couple of the tables that I was playing on.
So I decided to use a plywood base, which would give me the support the base needed without me having to use a thick 2" foam base like I used for G&G. This would make the display base significantly heavier, but sturdier and much more squat.
After that I started building up the tiered structure with 1" pink insulation foam and foamboard. In the pictures you can see that some of it has been painted blue. This is because I didn't have any 1" board on hand and decided to recycle a beach terrain board which I was probably going to end up throwing away anyway.
I did a tiered effect because I wanted to be able to recreate the look of the Zoo in the game, with multiple levels connected by gently sloping ramps and staircases. I used foamboard for the ramps. Originally there were going to be two on each side, as you can see from the markings on the board in the picture. I decided to go with one ramp on each side, so that I would have more room for the animal enclosures.
I generally use foamboard as a topper for my display bases, because it's about the same thickness as a warhammer slotta base so it's easy to just trace the bases on the foamboard and then cut out slots to put them in. I added more slots than I needed for this particular list. I wanted to make it possible to change around the army if I wanted to. There are slots to increase the size of the four units from 8 to 10, and there are also slots to add in five terminators. In the meantime, I would make 'filler bases' with scenic details on them. Later in the development in the base, I realized these filler bases would also make good objective markers.
I also used the foamboard to make the staircases, by stacking smaller and smaller lengths on top of one another.
I have been doing a lot of mold making in recent months and have made a bunch of molds of 'cool bitz' that I would like to make more of for my terrain and conversion projects. One of the things I molded were a few stone wall pieces from an old Mage Knight modular dungeon kit. The wall sections are 2" by 2" and I thought they would be perfect for making buildings and other structures. I ended up using them extensively to make the stonework for this display base. The curved pieces I did by glueing them in place on the curved wall sections right after casting while they were still soft and bendable.
For the fencing sections of what would be the monkey cage, I made the frames with thin plastic piping from Hobbytown. I laid out a section of screen door screening over a piece of insulation foam, and then sprayed the area I wanted to use with zip kicker. Then I put glue along one side of the frame and pressed it down, where it instantly bonded to the zip kicker. I put the foam under it because it melts away from the reaction of the glue and accelerant, so no unwanted crud gets stuck on the other side like there is if you glue it down on top of paper.
For the shorter fence on the Nurgle ifested side of the display board, I just used fancy toothpicks as fence posts, rather than building a frame. After the fences were done, I used a hobby knife to cut some holes in them where the warriors of chaos would have cut their way in (and out) of the animal enclosures.
With the fences glued into place it was now time for some fun with little plastic animals. I used a pin vice drill and my hobby knife to gouge bolter holes and make pieces blown off of the animals which were going to be statues, then went and dismembered a bunch of other animals that were going to be carnage on the display base.
I wanted to have some human casualties of the attack as well, and to this end, I made molds of another of my favorite bitz, the corpses from Flintloque's Graviski Reanimator kit.
I cast a bunch of corpses and glued them onto the display base and glued some down to slotta bases to make most of my 'filler bases'.
Throughout the final stages of construction, I also glued down the sand in layers, giving time in between to allow for drying. I started with kitty litter for the areas I wanted to be most textured, then did sand, and finally, some talos.
Then it was time to spraycoat the display base. Before I did, I went through and used red paint (because I had a lot of cheap red craft paint) to go over areas that were exposed styrofoam. This is because exposed styrofoam will melt from the spray paint.
Now it was finally time to start painting!
I first went over all of the stone wall sections with dark grey. I used cheap acryllic craft paints for all of this. Then I lightened the grey and did my first coat on all of the 'concrete' surfaces, then lightened it even more to do the first coat on the animals. Then I started with a dark brown for the ground of the animal enclosures.
After giving it all some time to dry, I did my second coat with lighter versions of the previous colors.
I did a third coat as well, which was a very light drybrushing.
Then I did the fences in Boltgun Metal.
Next was the bodys and the carnage, which were all painted appropriately and then given good amounts of Red Gore for their fatal wounds and the pools of blood they lie in. Red Gore was also added in spatters to the display base as a whole.
Now really having some fun, I started adding some good old bloody scrawls, the staple of horror movies. I included nods to a couple different sources.
Redrum is the most obvious and recognizable of these.
"Please stop me" is from the game Manhunt, where it is written in blood on the forehead of the masks worn by one of the lunatics stalking you.
"Itchy.. Tasty.." is a reference to the original Resident Evil. It is the final journal entry of a researcher who was exposed to the virus and became a zombie cannibal.
"Do you see?" is a line repeated several time by a character from Event Horizon, as he shows a character mental images of hellish depravity.
The final details were the reinforced glass of the big cat enclosure, which I just used the plastic from a large blister pack for.
The foliage in the planters was made by drilling holes and then gluing down bits of a plastic plant I got from a craft store almost a decade ago and am still getting tons of use out of in scenery projects.
And here again is the finished version.
I'll do another post at some point soon, detailing more of the miniatures that made up the army, where I will include some more close up shots from this display.
Tuesday, September 7, 2010
I've been working on the Eyes of the Medusa since my last post, and now with a Brothers Grim 40K charity tournament that I've signed up for coming up in a couple weeks, I've kicked it into high gear and for once, things are actually looking pretty good two weeks out, with only Lord Horrificus, three obliterators and a predator to finish painting. Over the weekend I added a couple more things to the Completed column. My chaos lord chaplain, his Nurgle cult of fallen space marines, and Granfaloon, the greater daemon responsible for the corruption of the once noble chapter of space marines.
Chaplain Olgein and the cult of Nurgle The chaplain was a conversion of (I believe) the space marines captain from the Black Reach set. I added a power fist, and an arm with a crozius, distended his belly with some green stuff and added holes in the armor, and then a modified Khorne berserker head for the skull helmet. I glued sand down in patches on the armor to represent it being corroded and encrusted with filth. I sculpted some foul growths on the crozius (now a daemonic weapon) with some tentacles coming out. As a finishing touch I added a nurgling on his shoulder.
The rest of the group were converted from plague marines and space marine parts thrown together. The medusa head shoulder plates were sculpted from scratch and then molded and casted. The rhino transport (one of the older, smaller models) had the hobby knife taken to it, and then was covered and sand and green stuff. Everything was painted in the chapter colors (snot green/knarloc green, scorpion green, sunburst yellow) and then 'screwed up' with a brown ink wash followed by a devlan mud wash.
Granfaloon, the Eye of Madness This guy was fun. I had done half casts of the corpse cart corpse pile with the idea of doing a wall of corpses or something equally disgusting at some point along the line, and then thought of making a ball of corpses with tentacles and an eye in the center. Why, you might ask? I'm sure psychiatrists have a definition for it, but the long and short is that I saw it in a video game and have wanted to make a model of it for a long time now. As I said, I'm sure there's a term for my condition. Regardless, once I figured out how I could do it with my new corpse pile half mold, I set about my task with gusto. The greater daemon started life as a plain cardboard christmas tree ornament from the craft store. I drilled some holes in him and threaded wire through for the tentacles then twisted more wire to make them thicker. Then I started casting my 'tiles' of corpses and gluing them all over the ball, overlapping at several points. With green stuff I sculpted the meat on the tentacles and then filled in empty spaces between the corpses. The casting compound dries white so Mrs. Carnivean had taken to calling this thing my 'big popcorn ball with tentacles' as I worked on it off and on over the past month or two. To be honest, that was exactly what it looked like, and I was starting to get a little worried about it. Once I spray coated it black and added the first coat of tallarn flesh/rotting flesh I could instantly see how cool it was going to look, as all the tortured bodies began to stand out in all their ghoulish glory. I did a red ink wash, followed by another coat of tallarn flesh/rotting flesh. I may go back and do more washes, but right now I'm not sure if it needs it. I did painted the eye and the tentacles, and here he is. The fluff for this is that the daemon swathes itself in the tortured souls of those it has brought to damnation. I had wanted the greater daemon in the army to be the thing that appeared to the Eyes of the Medusa in the warp and drove them all to madness, so I knew I needed something that would be pretty horrific to look at. Originally I was going to go with something with multiple goat heads on a tentacled body, but I decided to save that look for the Jabberslythe I'm eventually going to build for my Beastman army. When I thought of doing the big corpse ball to represent him I realized that image would definitely be something that could drive people insane. I named him Granfaloon, since that was the name of the boss creature from the video game (Castlevania) that inspired me to build him.
 Eyes of the Medusa
 HQ
HQ Troops

 104 - Summoned Daemons x8
 Elites
 104 - Summoned Daemons x8
 Elites
 Heavy Support
 Heavy Support
 150 - Defiler